06 Dec Create an Abstract Cloud Jumper using Photoshop
![]()
Today i would like to share a out standing & stylish tutorial .In this tutorial, we’ll manipulate a photo with abstract elements to make it more interesting and active. It is not a lengthy & difficult tutorial. So why not have a try…
Materials Needed:
- Stock Photo of your choice. I have used my Stock: Female & Funky Swirls.
- Cloud Brushes: JavierZhX
- Photoshop Action: Manicho.
Step 1: Plan Ahead
![]()
First thing to look at is the angle of your photo and consider what direction your photo is already moving in. If you take a look at my final outcome, I chose a diagonal angle (already an active direction) since that is what fitted best with the subject.
I have also chosen to use the two main colors that were already on the stock photo—Grayscale (black/white/grey) & Blue. You may also want to add tones/ contrast at the very end but we will get to that soon enough.
Step 2: The Swirls
![]()
I have opened up the .EPS file for the swirls to a nice large size and cut out 3. Using our imagination, we can place them and rotate them to follow the direction we decided earlier on. Once you have them in a nice place turn all of the swirls grayscale (Shift+Ctrl+U). Make sure they are all on separate layers.
The reason as to why I’ve told you to keep the swirls on different layers is because we will be editing them a bit and you wouldn’t be able to do that if they are all merged flat layers.
![]()
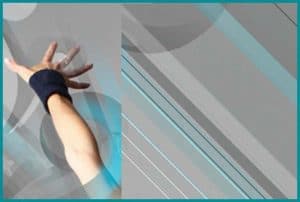
Swirl 1: This is the swirl on her left arm. Set the layer opacity to 50%. I really don’t like having so much grey on the model—the base stock is what you have to either go around or try to “flow” through. I will be removing some of the swirl parts to make her body still show yet still have some swirl bits around her arm as if it’s joined to her or as if she’s jumping through it.
As you can see I have removed parts from her arm and stomach.
When you remove parts of the swirl you can use either or both of these tools: Eraser Tool with a Soft Brush and/ or the Polygonal Laso Tool. The Pen tool can be used to draw selections or masks too if you feel comfortable with it. I used the Eraser Tool for the stomach area and the hand, while I used the Polygonal Laso Tool for the arm.
![]()
Swirl 2: This is the swirl on her right arm. Set the layer opacity to 50%. This is pretty much the same as “swirl 1″: make it flow with her body in the angle she’s jumping.
As you can see I have removed parts from her arm and hand.
![]()
Swirl 3: This is the swirl on her legs going up to the stomach. Set the layer opacity to 50%. This is a bit more difficult then the other two as you may have to remove some more to make it look good and not “out of place”.
Step 3: Adding Some Color
![]()
Save your work regularly and keep all layers. Saving more than one copy with save as… can’t hurt if you want to try different variations of your document.
![]()
To add some color onto the swirls/ graphic just take a soft round brush and make a line curving inside parts of the swirls, this will make it look as if the colors were on it already.
This is just a base—the swirls and color will look more refined later on.
Once you have drawn a few lines (if they are not close it’s okay to put them on the same layer but if they are close together put them on separate layers. This makes editing easier.) use the Smudge Tool. Point the corners out making them fade around corners.
After you have smudged all the brush strokes, set those layers to Hard Light blending mode.
![]()
It will now look like the image to the right. It should have a nice ‘glow’ to it.
You can repeat this process for any other colors you may want to add, just be careful you don’t combine so many colors that nothing fits together.
Step 4: The Diagonal Line
![]()
To create the lines in our image, we’re going to use the Polygonal Laso Tool. You can also try a pixel stretching technique, and rotating the stretched pixels if you’re comfortable with that.
All you have to do is click (outside the art) hold down Shift on your keyboard and click again over the other side of the art (while holding shift you will see it the tool works in nice angles) make a straight line down a few pixels click again then work your way back up to where you first clicked. It’s a diagonal line! Fill it in (with the paint bucket) once you’ve closed it off.
Create a few more stripes in various sizes and color.
![]()
All my diagonal lines are on top of all the other layers. I have also used different colors to fill in the lines, various versions of the blue color that I selected – darker blue, lighter blue etc.
Now to make them blend more merge the stripes. Duplicate (CRTL+J) the stripes and hide them (click on the eye next to one of the stripe layers). Set the new stripes layer to: Color Burn. Now this will look a bit heavy on the eyes so get your Eraser Tool and set it to a really big size( “]” key) and remove 50% of the stripes in the middle like the image below:
![]()
Now Un-hide the other stripes layer, duplicate it and repeat the above step but with a layer setting of Overlay and erase a different area, but keep the stripes away from the stomach, face etc etc you can touch parts of the body with the stripes just don’t cover the model in them.
If you want more intensity in color if you haven’t got a lot then duplicate the original stripe lines and go to Filter -> Blur -> Gaussian Blur and set it to about 20 and layer setting to
Overlay move them to a part where there isn’t many lines.
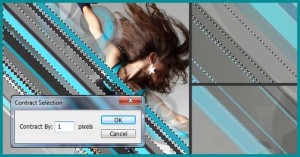
Keep an original stripe layer at all times while doing this. Once you’ve done all the stripes you can now add the stripe “lines” this is done by using the original stripe layer—select all the stripe layers (CTRL + Click the layer with he original stripes). Go to Select -> Modify -> Contract, a small box will pop up, by the size of your image it will depend if you want nice small 1px lines put in 1. I will be using this setting (1 for 1 pixel lines). Once you click “OK” it will contract it for you, press delete on your keyboard.


Your original stripes are now 1 pixel lines. Do the same as what you did with the bigger stripes but you can set them to anything you like, I will be setting the layers to: Linear Dodge and Overlay. Don’t forget to keep an original handy but hidden. If you want your 1 pixel lines to stand out more you can try this, get any layer of lines duplicate them and go to Filter -> Blur -> Gaussian Blur and set it to about 2.0 to 3.0.
You can also duplicate the bigger lines to add to random areas, for example her right arm is facing slightly away from the angle I chose so I will add a little bit of the big stripes next/ near to it. Also her knee is facing downwards so I added a little bit there too.
Step 5: The Blue Gradient Lines
This Requires the Pen Tool. I am only using this to increase the intensity of the blue colors in the swirls.
When I use this tool I use the settings shown in the image below.
![]()
Make a new layer then select the Pen Tool and click on the end of a blue smudged area (on the swirl part) then click on the other end of it. You should have a line, click in the middle of it and click and hold CTRL (also hold the left mouse button down like when you click) and drag it to a rounded shape, click near the first point you created and do the same so it sort of looks like the image above.
![]()
Right click the path (the rounded shape you just created) and click Fill Path. Make sure you have the blue color selected as your Foreground color. You should now have a blue shape with the pen tool paths still around it—just click delete twice to get rid of the paths. Once you have the shape by itself get the Eraser Tool and rub out the inner part of the shape then set the shapes’ layer to Hard Light like the image to the right. Duplicate it and move it down slightly. Do the same for the others.
Step 6: The Clouds
![]()
Use which ever cloud textures/brushes you want. I have picked 4 just to surround the model.
One more thing.
Keep the clouds at the angle you have chosen otherwise it might not fit in. Also remember whenever you’re doing a graphic with brushes, stocks, actions etc check with the artist for terms of use etc.
Step 7: Tones & Sine dots
I used a program called Sine dots II plug-in for Photoshop to get the white lines across the model. You just download it, open it up in the filters menu and click random till you get a nice one that will fit in with the image. Duplicate it and blur it to 3.0.
Really, it’s that simple.
If you’re clever with Illustrator, you can probably create them using that software as well.
For the Tones, I like using “Photoshop Actions” or “Photo Filters”. Some are great, some aren’t so great. Here are some examples:
![]()
With this outcome merged everything and placed the merged image into a new canvas, duplicated the image twice and the one closest to the original I set it to Multiply (layer blending), then added the tone from Manicho (found in at the top of this tutorial) its “#42 Contrast Desat 3″ onto the second one, set that to Overlay, opacity 50%, duplicated that and erased the top and bottom grey corners to add depth to the model/ graphics.
Final Result:
You can see the original full sized piece here. This tutorial is based off my original work shown in the full size image.

Hope you like this tutorial.
If you have any suggestion, please drop your comment below.
Have a nice day.
Credit: photoshoplady.com
T.G.
Posted at 08:02h, 16 FebruaryAwesome tutorial. Great work. Thanks for the clear instructions. This surely gives some thoughts to think about… 🙂 Good luck with your blog. loved this one.
Clipping Path Designer
Posted at 04:21h, 17 FebruaryThanks for your nice comment T.G. Please stay tuned & enjoy innovative tutorials 🙂